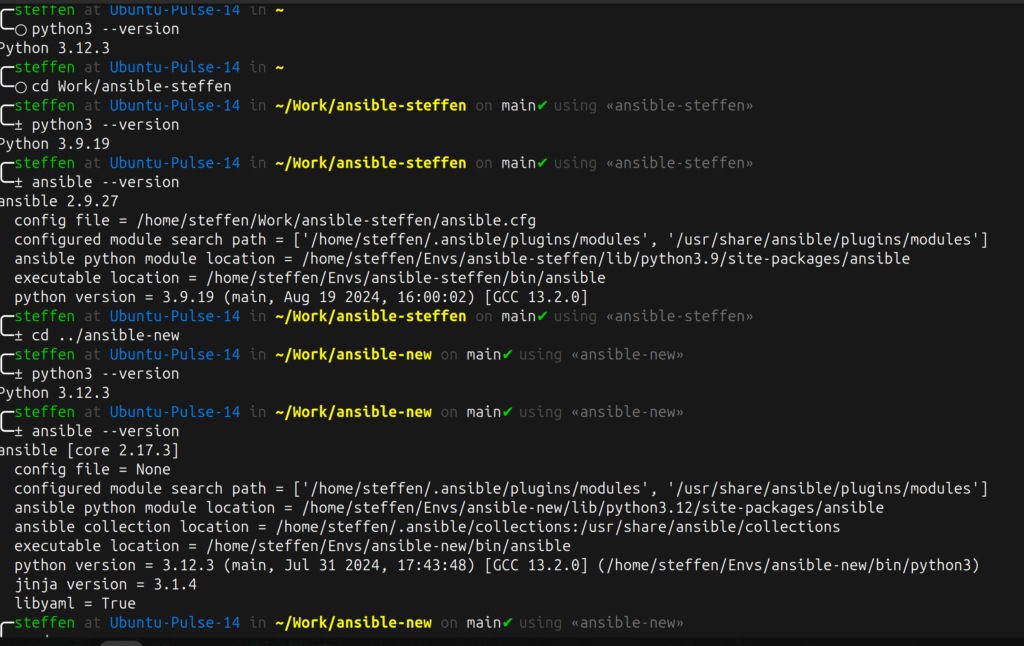
It was time to get a move on switching to newer ansible versions.
Newer ansible versions require newer python. But while switching you still want to keep the old stuff running on the older python version.
I am not a python guy, so a colleague said to use venv (which he does) or virtualenv. Really simple you just set up the bla and the bla and when you want to switch you jump through the hoop and press here and and and … puh !!
I did mention that I am not the python guy and I hate jumping through hoops on a daily basis, so what does that mean? In python it is common to use venv or virtualenv in order to have differen python environments for different projects. So ansible being python it comes natural that ansible should work with virtualenv as well. So let’s automate it, what else!
Once I was done it was as simple as switching directories without having to think about it anymore and looks like something like this:

Well let’s start at the beginning, tried this on a new Ubuntu. Python3 version there said 3.12.3. But for my old ansible stuff I needed nothing higher than 3.9.
So first I downloaded 3.9.19 – https://www.python.org/downloads/ and then did something like this:
cd /tmp
mv /home/username/Downloads/Python-3.9.19.tgz .
tar xf Python-3.9.19.tgz
cd Python-3.9.19
 ./configure --enable-optimizations
 sudo make altinstall
While it is building watch for any errors, I was missing:
zlib1g-dev libgpgme-dev libsqlite3-dev tk-dev libreadline-dev ncurses-dev lzma-dev libgdbm-compat-dev libpq-dev
This of course may vary on your machine.
You should now find python3.9 in you /usr/local/bin. So far so good. Now let us get that virtual thing going. Make sure you get out of the install directory and that you are definitely still using your original Python at this time of writing. (Do not ask me how, but I messed this up on a test install some way or another).
sudo aptitude install python3-virtualenv python3-virtualenvwrapperNow virtualenv is where the magic happens. The virtualenvwrapper is great for lazy people like me, to get a better understanding check out the docs: https://virtualenvwrapper.readthedocs.io/en/latest/
Next part might work for you or not, but I ended up making two directories „Envs“ and „Work“ right next to each other. The idea is to store the environment information in one place and your actual work in a different directory. The „Envs“ part is from the virtualenvwrapper example, worked just fine for me. I also added the export to my „.profile“.
export WORKON_HOME=~/EnvsIf you do not make an extra Envs directory it will simply default to your home I believe.
Now we are actually ready to get going, but STOP. We want it looks nice and we want it to „talk“ to us, right?
So in my case I use the ohmyzsh (https://ohmyz.sh/) and specifically the https://github.com/ohmyzsh/ohmyzsh/tree/master/plugins/virtualenvwrapper.
So if you want to follow along, now is a good time to change to zsh and install ohmyzsh. All you need to know can be found here: https://github.com/ohmyzsh
You can use whatever theme you like, in my example above, I choose „fino“. So the following two lines in my .zshrc look like this now:
ZSH_THEME="fino"
plugins=(git ansible virtualenvwrapper)
Do not forget to source your new stuff make sure your .profile is reloaded (~/.profile or ~/.bash_profile is the login script and is not supposed to be loaded for every interactive shell, only by the initial ‚login‘ shell).
So double check before continuing that echo $WORKON_HOME is what you expect it to be. Now the virtualenv that you are creating needs to match the name of your projekt (git directory).
mkvirtualenv ansible
deactivate
The plugin allows to automatically activate virtualenvs on cd into git repositories with a matching name. So The important part is to call the virtualenv the same as the folder you want to use it in (sorry for repeating myself, but this is important). This is where the virtualenvwrapper comes into play. Now deactivate it right away again as you do not want it to be active everywhere.
Now watch the magic and go to the Work/ansible folder. Bahm !! as you enter the virtualenv turns on. As you leave it turns off.
Now you can create individual virtualenv for different folders and not worry about using the right one in the right place. It is all switched for you. All you need to make sure is that you are in the right place while installing stuff into it.
So, now what was the Python 3.9 for at the beginning? Right. That was for my „old“ ansible. So let’s get going and install that into our ansible virtualenv. Ups, we should have mentioned while creating, well then lets delete the old one once and create it again, good practice and do not really worry, as this simply kills the created part in your Envs folder and does not touch your project files.
rmvirtualenv ansible

mkvirtualenv -p /usr/local/bin/python3.9 ansible
That was it.
You now have my setup from the screenshot at the beginning of the article. You can install different Pythons and different ansible versions as you like.